Thursday, May 28, 2009

Joy card


The main image for this card is from the Ooh Baby plate from The Stampsmith. It is stamped with Memories black on glossy cardstock and coloured with waterbased markers applied with a paint brush. The spin art background is made with acrylic paints , cut out with a Spellbinders die and edged with a Krylon gold pen. The mesh background stamp is from Stampington and was stamped on the base card using Versamark , the dots are SU and were stamped with green versafine. The white vinyl Joy sticker was made on my KNK electronic diecutter -font is PassionsConflictROB.

If you would like to know more about the inspiration for this card, please check out the Joy of Making post on my blog.

Card from Karen Fisher

Karen sent in this gorgeous Audrey card for The Stampsmith Blog.  Isn’t it fabulous?  I mean, how could Audrey ever look bad? lol


028

Karen sells her cards on Etsy, and this one is sold already.  Karen has been invited to be a Guest Designer for The Stampsmith.  We will announce the names of the others that have been invited at the beginning of next week!

Thank you so much Karen!
:)
Kim

Recipe card from Laurel Sherry


Laurel sent this in to put up on the blog.  This is her first project using The Stampsmith rubber stamps!  I think it turned out wonderful Laurel!


recipe


Thank you so much for sending this in Laurel!

:)
Kim

Card from Carol Quance

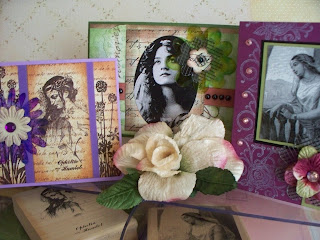
Oh my, what an eye catching card this is, and it’s in my favourite colour, purple!! lol  I just love it and this is such a beautiful setting for the card!


Jo 09v2 

Thank you so much for sending your card in Carol! 

:)
Kim

Card from Cassia Nasser

Cassia sent in a beautiful card using a stamp from the Kiss Me you Fool plate.  Cassia does amazing work and is well published.  It’s a pleasure to spotlight her work on The Stampsmith blog! 


kiss_me

Thank you Cassia!

:)
Kim

Card from Kathy Rossiter


Kathy submitted this awesome card and even supplied us with the instructions on how she did this technique.


Here are the instructions:

The technique is called Bingo Blast from http://www.patstamps.com/ Technique Junkie Newsletter

Supplies: 2 or more colors of any of these: bingo markers, window paint daubers, Tintz daubers, etc.; anything w/ a foam dauber applicator; you can even make your own

Try diff. papers, ie: watercolor, glossy, cardstock. Watercolor paper works well w/ the bingo daubers

water spray bottle

1. Bring the dauber ink to the foam surface and spray w/ water
2. Turn dauber upside down and "blast" it onto your paper so the ink spatters.
3. Repeat w/ more water sprays for bigger splatters.
4. Repeat w/ other colors until desired look is achieved. Be creative w/ color combos, and hitting colors on top of colors.
5. Air dry and use as backrounds for cards or stamp directly onto your piece.

Thank you so much for sharing your art with us Kathy!

:)
Kim

Tuesday, May 26, 2009

From My Hardware Store to Art...


Happy Memorial Day! My hubby and I were running some errands early this morning. As usual, he was looking for items to fix the house while I was looking for items to stamp with ;-) I found some treasure in the tile section of my local Home Depot. Hope you enjoy these two tutorials. If you have any questions, please let me know and I will be happy to clarify anything that I may have left out of the video. HugsMaria

Part 1


Part 2

Sunday, May 24, 2009

Nights in White Satin...


Doesn't she look like a queen? I used Versafine Deep Lagoon on glossy cardstock to stamp out the last of the "Haunting Eyes" stamps. Embellished her jewels with Aqua Blue and Crystal Stickels. A girl has got to have some bling in her life ;-) Have a great weekend everyone!
Hugs,
Maria

Friday, May 22, 2009

Beeswax Ophelia Card by Chris Slater

Chris Slater sent this card in to be posted on the blog!  I just love the Ophelia stamp and Chris, your card is just beautiful!  I love the beeswax technique and you have done such a wonderful job on this card!  Thank you so much for sharing with us!

 4x4 beeswax

 Have a great evening,

:)
Kim

Jim Morrison – New Rock’n Roll plate

Deborah March sent me this card this morning to post to the blog! 

Here is what Deborah had to say:

I created this card for my son, who's recently been accepted into a college program beginning in September. He's a child of the sixties, even though he was born in '85! His favourite group ever is the Doors, and Jim Morrison is his favourite singer. So when my friend Kim showed me this Stampsmith image of Jim Morrison, I knew I had to use it for his card.

I also used one of my son's favourite Jim Morrison quotes, part of it is on the front of the card, and part inside:
"There are things known and things unknown, and between are the Doors."
So, I stamped the Jim Morrison image, then the Impression Obsession door image, then used embossing paste with a brass stencil for the music symbols.

Michael Doors

Thank you so much for sharing this awesome card with us Deborah!!

:)
Kim

happy


The theme at the make a moo or two challenge blog is happy. I think this has to be one of my best "happy" images, taken fom the stampsmith's girlfriends stamp. You can also see it on my blog.

Thursday, May 21, 2009

Part 3 & 4: Stampsmith's "Haunting Eyes" Card Tutorials

Part 3


You will need the following items to make these cards:
Glossy White Cardstock
2 Speedball Brayers
Ranger Adirondack Latte and Slate Dye Ink Pads
Versafine Onyx Black Pigment Ink Pad
For stamping white accents: Brilliance Moonlight White Pigment Ink
Zots Acid Free Clear Adhesive Dots
Memory Box: Vine Branch Rubber Stamp (D1240)
Clear, Wide Shipping Tape
Foam mat or mousepad for stamping on
Clean Paint Brush
Nestabilities Die: Oval
Adhesive backed bling or pearls
White Card: 5 1/2" x 4 1/4"
Dark Brown or Navy Cardstock Layer 1: 5 1/4" x 4"
Light Peach or Gray Cardstock Layer 2: 5" x 3 3/4"
Dark Brown or Navy Cardstock Layer 3: 4 3/4" x 3 1/2"
Double Stick Tape

Hugs,
Maria
http://www.velvetinkcafe.blogspot.com/

Part 4

Time to Play Tutorial: Part 1 of 4

A fun tutorial posted in 4 parts for your viewing pleasure ;-) I had so much to share and besides...it has given me an opportunity to practice using my new video camera. So here goes...

Part 1 and 2 videos start off showing you how to use drywall tape....YES! drywall tape to create embellishments for your Stampsmith cards and projects.

In parts 3 and 4 I will show you how I put together cards using Stampsmith's "Haunting Eyes" rubber stamp plate.

So go grab yourself a refreshing drink and a healthy snack...sit back, relax, and enjoy!

Hugs,
Maria


sympathy card


I needed to make a sympathy card, and I decided that the stampsmith's little angel (small) stamp would be perfect. This is a really small card, only 3.5 inches square. I inked the image with sepia and then touched the edges with black for this effect.

Would you like to see your Stampsmith art here?

Hi there,

Would you like to see your Stampsmith art on this blog?  If you have a card or project that highlights a Stampsmith stamp, why don’t you send it to me at kimmyprince@gmail.com .  I will be posting cards done by our readers at least once a week, depending how many cards are submitted.  So, if you would like to see your card posted here, please send them to me! lol

Have a wonderful day,

:)
Kim

Wednesday, May 20, 2009

Inspired by the Design Team!!

Just a quick note to send a warm welcome out to the new Stampsmith Design Team! I've been inspired by your gorgeous works of art and I can't wait to see what you have in store for us in the months to come!

Sincere congratulations!
Warmly,
Val


Here's a quick 6x6 card created for a crafty night swap with a wonderful group of friends.

Monday, May 18, 2009

Rosemary Reid


Just a quick note of introduction. My name is Rosemary Reid and I am so pleased to be part of the new Stampsmith design team. I have been stamping for about 8 years ( where did the time go? lol). I started out heat embossing words on dry embossed cards and then jumped right into photostamps, after seeing a lovely card done using the Stampsmith image Maude. I also dabble in wire jewellery, metal clay and polymer clay but mostly I am a collector of craft supplies. Here are a couple of spring cards made with Stampsmith flapper images. For some reason I love the lavender/purples and pink/greens for spring cards.

Saturday, May 16, 2009

Maria Loomis


Greetings from Seattle, Washington, USA! My name is Maria Loomis and I am honored to be chosen as a new Stampsmith Design Team Member.

My greatest love, apart from my fantastic family and friends, is paper art! My love afair with paper, rubber stamps and coloring started over 18 years ago. It began on a snowy, blustery winter morning when both my sons were napping. Bored and trapped in my own house, I popped in a Dee Gruenig video I had checked out from the library. I was hooked and I have never looked back!

I continue to teach a variety of paper arts and mixed media classes throughout Washington state and at my local home stamp store, Friends and Company, in Issaquah Washington. I absolutely love sharing and learning new techniques with my students.

It will be a delight to keep you all inspired by showcasing The Stampsmith's line of products along with Kim, Estelle, and my fellow Design Team members Joanne and Rosemary!

Feel free to visit my blog anytime at Velvet Ink Cafe.

Joanne Wardle


Hi, I just wanted to introduce myself. My name is Joanne Wardle and I am one of the members of the new DT. I live in the UK. I am so excited to have been chosen. I love stampsmith stamps, and I hope to do them justice on this blog.
I have been cardmaking for about 5 years, I didn't immediately get into stamping, but once I did I was hooked. I love the way that different stampers will take the same stamp and create completely different works of art. I love stamping onto different materials, and I love making things other than cards.
This Jar fairy is my first new contribution to the stampsmith blog. I made a jar fairy using this stamp some time ago, and it is one of the most visited posts on my blog.

Friday, May 15, 2009

Cards from 2 of our new Stampsmith Designers!


I am posting some of the cards that were submitted by Maria and Joanne for the Design Team competition!  When submitting you just had to use photo stamps on a card, they didn’t have to be Stampsmith stamps.  I am only sharing the cards that were done using Stampsmith stamps.  These cards are gorgeous and I can’t wait to see more!  Be sure to check back, we will have some cards from Rosemary up here soon too!

The following two cards were done by Maria.

ML.DesignerCall.Card3closeup

ML.DesignerCall.Card2closeup

The next two cards were done by Joanne.

stampsmith2  stampsmith1

Thank you so much for stopping by!  Please be sure to check out our new Design Teams blogs!  They do such beautiful work!

Have a wonderful evening,

Kim

The new Stampsmith Design Team!

We are pleased to announce The Stampsmith is ready to reveal its new design team!

First, we'd like to thank all of the talented ladies who applied and shared their works of art with us. Suffice to say, it was not an easy decision. There will be subsequent teams and guest artists so, for those who didn't make it, there will be future opportunities. Until then, keep up the beautiful work!

The wonderful Estelle, the Stampsmith herself, is attending the Stamping By The Sea rubber stamp show this weekend, but is here in spirit with us as we announce our team. If anyone is in the Ocean City, MD area, stop in the Carousel hotel and say, Hi!! *details here*


OK, without further ado....


Kim Prince will be heading the design team of:

Rosemary Reid, Maria Loomis, and Joanne Wardle!


Congratulations Ladies!! We can't wait to begin our journey with you!

Stampsmith Design Team Announcement Today!

Good Morning Everyone,

We will be announcing the first Stampsmith Design Team today!  Check back in a few hours!

Good Luck everyone,

:)
Kim

Wednesday, May 13, 2009

Live, Laugh, Love


Good Morning,

I have had this image stamped and coloured for a couple weeks, but I couldn’t decide what to do with it until late last night!  I found this beautiful background paper at M’s a few weeks ago, and decided it was time to cut into it!  I didn’t want to cover it up too much, and look, NO distressing! lol  I mounted the Audrey stamp (from The Stampsmith) with pink Bazzill Bling and light brown  Bazzill, then layered that all onto the background paper.  I then used my new die cut from Quickutz (Flourish), one in brown, one in pink, then added those, and put on some lovely little crocheted flowers!  I actually traded some stamping supplies that I was selling, for the crocheted flowers!  I love the barter system!  I then stamped the saying, Live, Laugh, Love from Inkadinkado twice with Chestnut Roan Chalk Ink.  This was all layered on pink Bazzill bling paper, then the light brown again.

The Stampsmith photo stamped image was stamped with Ancient Page Chocolate brown, the very lightly coloured in with Tombows and a water colour paint brush.  I wanted to keep it light.  Isn’t Audrey just beautiful?

 Audreylivelaugh [50%]

It is a beautiful morning here in Halifax!  The sun is shining, and the birds are singing.  I think I may just spend the day stamping with all the windows open!  Sunshine always makes the day!

Enjoy your day!

Kim

Saturday, May 09, 2009

The Stampsmith Design Team

Good Morning!

I just wanted you all to know that we are now going through all the applications and will have an announcement to make very soon!

Thank you so much to everyone that applied!
:)
Kim and Estelle

Monday, May 04, 2009

Dare to be Fabulous – Kim Prince


I have a couple Stampsmith cards to share with you tonight.  Both are stamped with Ancient Page ink, then coloured in with Phototwin markers and watercolour brush.  The Marilyn card was distressed with Tim Holtz Distress inks.  The Audrey card used many of the cuttlebug and Nestibilities dies.


fabulous [50%]


Glamour [50%]


Thank you for stopping by tonight!

:)

Life is a song…

Here is another beautiful card from Valerie Wilson. Enjoy!

lifeisasong

Sunday, May 03, 2009

Beautiful Eye Candy from Deborah March


I wanted to share some cards with you that Deborah March has made.  I hope you enjoy!


Astaire and Rogers

birthday posies Stampsmith Photo 5


Stampsmith 3 


stitch and stampsmith


38 Stampsmith I am Beautiful


24 Stampsmith Remember


Stampsmith 2


21 Stampsmith Diva   

Have a wonderful evening,

Kim  :)